November 5, 2013

Crucifix Process 7

This will be the last process update until December, because the crucifix is hanging at the show for the month of November. The process photos are taken between Oct. 22 and 24.

On the last post, I showed the underpainting process. This post shows the glazing process. It's tempting to just show the photos that look like everything was going perfectly, but truth be told, the first day of glazing was a lot of frustration. In the past, I had used Liquin fast-drying medium as a painting medium. But I've since read that it starts to turn brown after only a few years, and I think I can see that happening already in the painting that currently hangs at Trinity Chapel.

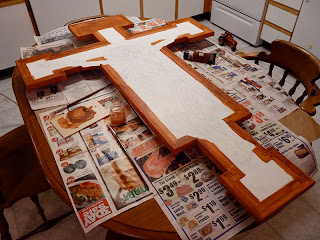
So I did some searching online for a recipe for a more traditional glazing medium. The ingredients I saw most often were stand oil, Dammar varnish, and turpentine/mineral spirits. The first mixture I tried was far too sticky, and trying to modify it two subsequent times resulted in equally poor results. The photo below shows the first of three attempts, each of which I had to wipe off with mineral spirits. This is why it is important to wait until the underpainting is thoroughly hardened before glazing.


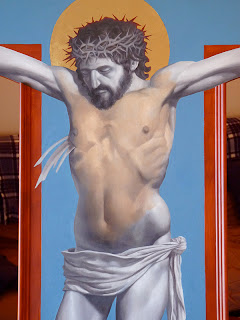
With the fourth attempt, I scrapped the whole batch of medium and mixed refined linseed oil with some mineral spirits and a small amount of Dammar varnish. The drying time I knew would be slower, but I didn't have the time to experiment for the perfect medium. Because I wouldn't have time for subsequent coats of color before the delivery date, I had to modulate the color on a single layer.


The underpainting on the face and loincloth were still tacky, so I had to wait two more days before glazing them. Otherwise, the first layer of color could have been completed in a day.



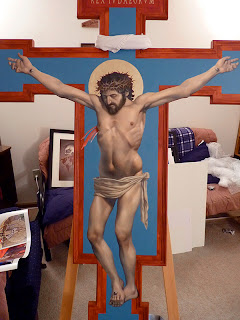
Oct 26 was the delivery date. Here it is riding comfortably in the back of my parents' van, on every blanket we own, and over top of the other framed artwork. Before I call the crucifix finished, it probably needs at least two more layers of color, and when that is dry, I'll finish gilding the frame. After everything has dried for a few months, the last thing I'll do is cover it with a coat of varnish.

November 3, 2013

Crucifix Process 6

I'm long overdue for another update on the crucifix. These photos were taken between Oct 15 and 21, and they outline the entire underpainting process. Making an underpainting in grayscale goes back to the early Renaissance. Not long after oil paints had been invented, painters began to discover that one could paint the values (light and dark shades) of the form first, and then paint thin layers of color over the top, letting the underlying structure show through, and giving the body a luminous, life-like quality. It takes more time and effort than painting the figure alla prima, but the result, I think, is well worth it.


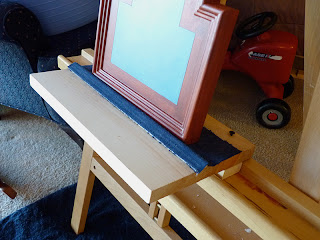
The first thing I had to do was build an extension to my easel, because the supports I screwed to the back made the cross too wide to fit onto it. I just screwed some scrap wood to it, and glued a piece of cloth to it just to give it some added protection. (I'm thinking forward to when there will be gold leaf around the edges.)

I began the underpainting by filling in the light and dark areas I had outlined in the cartoon with solid color, almost like a paint-by-number. When I had the values blocked out, I could then blend them together and refine the form. I painted one area of the figure at a time.


Reference is invaluable. Cloth is especially not the sort of thing that you want to invent when you're working at this scale and level of detail. It has a sort of structured chaos that is very difficult to fake. So even though I didn't have a body of Christ in front of me, I set up a sort of still life and photographed it in a few different lighting situations. I could then pick and choose details from either photo that were more interesting, or that seemed to work best on the figure of Jesus. The end result is much more convincing than it would have been if I had tried painting from my imagination.


The underpainting has to thoroughly dry before I can attempt to start glazing color over it. Every part of the underpainting except for the loin cloth had been drying for four days before I started glazing.

October 19, 2013

Crucifix Process 5

This batch of photos was taken on Oct 11-13. Between this post and the last, I had taken an awl and incised the outline of all the areas that would be gilded. This way I would be able to paint over the pencil lines and still have a clear guide as to where the metal leaf will go. All the areas that will have the metal leaf have to be painted with a red earth tone. Otherwise the metal will look cold and greenish when it is applied. I'm just using acrylic burnt sienna here.


Here I'm applying the acrylic base color for the visible portions of the cross. I pre-mixed a generous amount of this bluish color in a baby food jar, in case I need more of it. It's very difficult to match the same color again if you run out. I applied at least three coats of the blue, being very careful this time not to go over the incised lines.


If I hadn't inscribed the letters at this point, I would have no guide. But you can still clearly see the letters, even though they've been painted over with several coats of acrylic.

Since this is a model, I'm using the composition leaf I have on hand instead of real gold. In order to apply the leaf, I had to carefully apply the size (glue) to only the areas that would be gilded. This particular size has to dry for about an hour before the leaf can be applied. The tricky part was that it took almost an hour just to apply the size to the letters. So I couldn't apply the leaf all at once.


I cut the 5 x 5" sheets of leaf into smaller pieces with a knife on a leather pad. Using a fan brush, I picked up one piece at a time and laid it over the size. After all of the leaf has been applied, the excess needs to be brushed away. I started with a the fan brush, but it eventually required a brush with a bit more stiffness to it.


Afterwards, I repeated the same process for gilding the halo. Cleanup is surprisingly easy. You can just sweep up the loose bits of leaf with a soft brush, and the static causes them to stick to the bristles.

I had planned at this point to continue on and gild the frame and molding, but I feared it would take at least a week to finish, once I had started. I decided to skip gilding the frame until after the art show—finishing the painting is more important right now.

October 16, 2013

Crucifix Process 4

Please forgive another quick photo dump! These photos were taken on Oct 9th and 10th. I redrew the sketch to be more anatomically descriptive, so I needed to make another full-scale cartoon in order to transfer it. Using my ink jet printer, I printed a tiled version of the sketch from Adobe Acrobat, then trimmed and assembled the pages with tape. This is much faster and more accurate than using a grid or a projector, and it costs only pennies.

You can see from the sketch that instead of shading it smoothly, I've outlined geometric shapes that approximate the light and dark areas. The curved contours have also been converted to more angular shapes. This will make it easier to transfer, and will help with the shading in oil paints.


After the drawing is assembled, I laid sheets of tissue paper over it and traced the drawing onto the tissue paper. (You can find large rolls of tracing paper, which works better, but I don't live near any art supply stores, so tissue paper works almost just as well.) Regular paper is too thick to allow pen strokes to transfer through to the graphite paper, so you need to use tracing paper or something very thin.

The cartoon is trimmed for accurate positioning.


I printed the inscription directly onto tracing paper, to
save a step. You can see the graphite paper underneath.


The drawing is completed after I outline the edges of the
gold leaf, which extends into the cross an extra .75 in.

October 15, 2013

Crucifix Process 3

I've been so busy lately I have not taken the time to post any process photos from the crucifix. These will not bring you totally up to its current state—they were taken between Sept. 18 and Oct. 9. Please forgive me for just dumping these without too much explanation—I've got to get back to work. I have less than two weeks to finish it!

I noticed the plywood had warped after application of the
gesso, so I screwed two 1x2s to the back to straighten it.


The molding is shaped to the contours of the body, to
help give the impression the corpus is overlapping it.

Where the molding isn't perfectly flush with the ply-
wood, I built up wood filler to make a seamless plane,
and sculpted the corners if they weren't perfect.

All of the molding is in place.


After a lot of sanding and about 6 coats of gesso, I'm
ready to apply the drawing to the cross!